Office中国论坛/Access中国论坛
标题: [ Office 365 开发系列 ] 身份认证 [打印本页]
作者: admin 时间: 2018-11-24 16:31
标题: [ Office 365 开发系列 ] 身份认证
通常我们在开发一个应用时,需要考虑用户身份认证及授权,Office 365使用AAD(Azure Active Directory)作为其认证机构,为应用程序提供身份认证及授权服务。因此,在开发Office 365应用前,我们需要了解AAD的认证和授权机制。
AAD认证授权机制当前的AAD支持多种身份认证标准:
- OpenId Connect
- OAuth2
- SAML-P
- WS-Federation and WS-Trust
- Graph web api
这几种身份认证标准会应用在不同的场景中,如OAuth2.0应用于Office 365应用程序接口,SAML-P多应用于Office 365的混合部署,我们在开发应用的过程中,最主要是使用OpenID Connect和OAuth2.0.因此,本篇内容中只涉及到OpenID和OAuth2.0两种类型的身份认证分析,后续文章中会涉及到Office 365的混合部署及令牌交换协议内容。
OAuth2.0是OAuth的最新版本,升级并简化了验证的过程,在资源授权方面,OAuth2.0支持多种授予流,Office 365使用授权代码授予流和客户端凭证授予流,两者适用于不同的应用场景,同时在AAD中配置权限也进行了区分,稍后会具体讲解。下图为标准的OAuth2.0处理过程:
[attach]63003[/attach]
OpenID是目前各大网站普遍支持的开放协议,OpenID Connect 1.0是基于OAuth2.0设计的用户认证标准,Azure Active Directory (Azure AD) 中的 OpenID Connect 1.0 允许你使用 OAuth 2.0 协议进行单一登录。 OAuth 2.0 是一种授权协议,但 OpenID Connect 扩展了 OAuth 2.0 的身份验证协议用途。OpenID Connect 协议(OpenId Connect 1.0)的主要功能是返回 id_token,后者用于对用户进行身份验证。<span id="mt4" class="sentence SentenceHover" data-guid="42ff71279f609ce44c6a4d52e2f52f5e" data-source=" For more information about OpenID Connect, see the specification, OpenID Connect Core 1.0." style="box-sizing: inherit;">
下图为OpenID的标准处理过程:
[attach]63004[/attach]
OpenID的标准过程需要以下几步:
1. 客户端(RP)发送一个请求到OpenID的提供商(OP);
2. OP验证用户,如果用户尚未授权,则跳转到授权页面;
3. 用户授权后,OP会引导用户返回到客户端,并会携带一个Token和id token;
4. RP使用收到的Token请求用户其他信息资源;
5. OP返回请求的资源信息
通过上述的步骤,第三方应用(也就是客户端)不仅可以验证用户的合法性,同时可以在用户授权的情况下获取用户基本信息。在AAD中使用的OpenID Connect 1.0为Auth2.0进行了扩展,在返回Token的同时,会返回一个JWT形式的id_token。AAD中的OpenID终结点配置信息可通过访问此链接查看:
https://login.windows.net/common/.well-known/openid-configuration 。id_token包含用户的基本信息,作为应用的CurrentUser属性。获取到Token后,应用可以通过此凭证请求资源,Office 365使用Bearer方式获取资源,请参阅Bearer Token Usage
授权代码流和客户端凭证授予流AAD中的授权代码授予流使用如下流程:
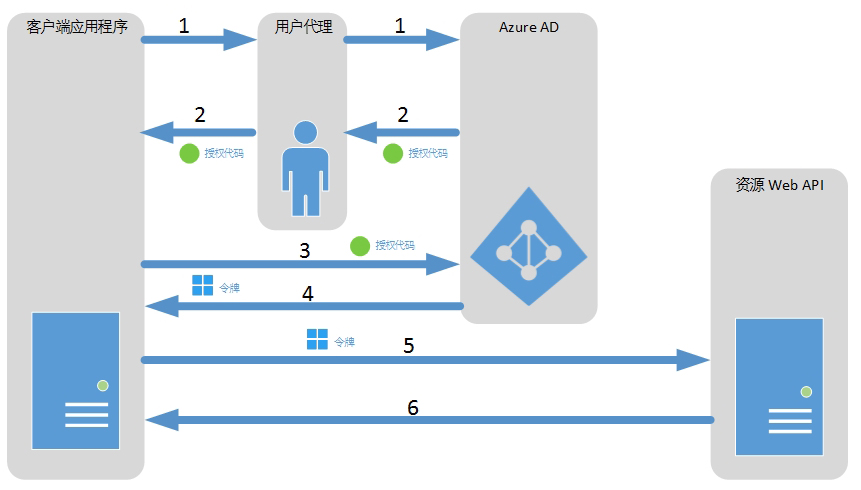
(此图引用自msdn)
对比OAuth2.0的标准流程,授权代码流会以授权代码(Code)的方式返回授权标识,用户通过使用Code请求资源Token,应用程序使用获取到的Token调用资源Web API。
当我们的Office 365应用使用授权代码授予流时,需要我们在AAD中设置资源代理权限,设置过程如下:
(一)通过Office 365设置页面进入Azure AD:
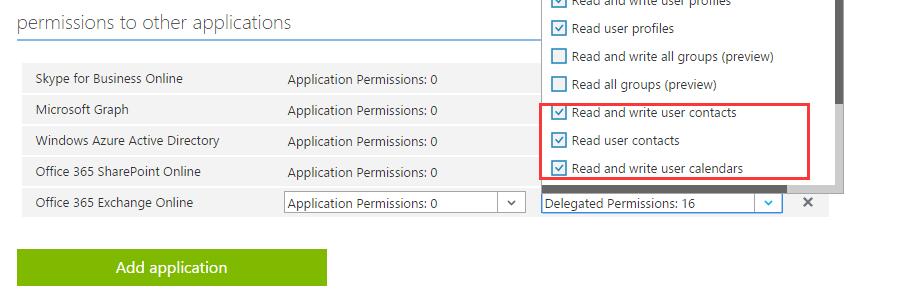
(二)进入AD中的应用程序,并找到我们的注册应用(如何注册应用请参考),进入应用的Configure页面,如下图:
(三)设置资源的Delegated Permissions,如果我们使用过授权代码流来请求资源,只需设置Delegation Permissions
AAD中的客户端凭证授予流使用如下流程:
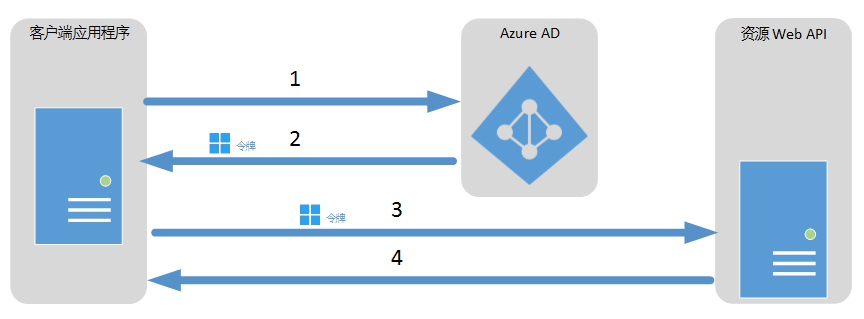
(此图引用自msdn)
与标准OAuth2.0流程相比,客户端凭证授予流不需要用户授权,而是由应用程序直接访问AAD请求token。请注意,如果使用此方式,则应用程序对资源有最大权限。
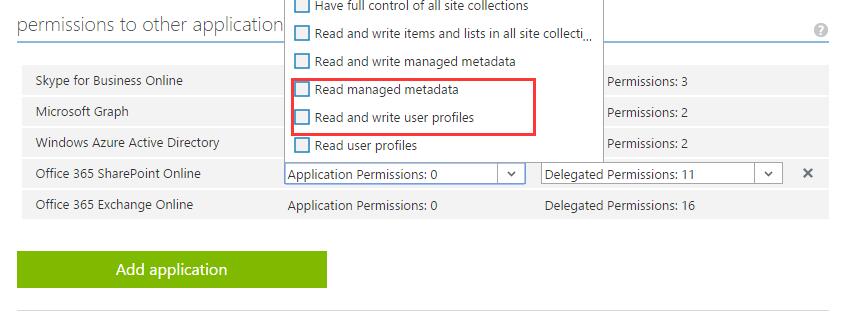
当我们的Office 365应用使用授权代码授予流时,需要我们在AAD中设置资源的应用权限,与授权代码授予流只是配置权限不同,设置的是Application Permission,如下图:
应用示例在实际应用中,我们通常会使用Owin中间件来完成用户身份认证,我们使用Office Dev Center中的实例来分析。
先来看如何实现用户登录后验证,我们贴出重要代码来分析:
- public partial class Startup
- {
- public void ConfigureAuth(IAppBuilder app)
- {
- app.SetDefaultSignInAsAuthenticationType(CookieAuthenticationDefaults.AuthenticationType);
- app.UseCookieAuthentication(new CookieAuthenticationOptions());
- app.UseOpenIdConnectAuthentication(
- new OpenIdConnectAuthenticationOptions
- {
- ClientId = SettingsHelper.ClientId,
- Authority = SettingsHelper.Authority,
- TokenValidationParameters = new System.IdentityModel.Tokens.TokenValidationParameters
- {
- ValidateIssuer = false
- },
- Notifications = new OpenIdConnectAuthenticationNotifications()
- {
- AuthorizationCodeReceived = (context) =>
- {
- var code = context.Code;
- ClientCredential credential = new ClientCredential(SettingsHelper.ClientId, SettingsHelper.AppKey);
- string tenantID = context.AuthenticationTicket.Identity.FindFirst("http://schemas.microsoft.com/identity/claims/tenantid").Value;
- String signInUserId = context.AuthenticationTicket.Identity.FindFirst(ClaimTypes.NameIdentifier).Value;
- AuthenticationContext authContext = new AuthenticationContext(string.Format("{0}/{1}", SettingsHelper.AuthorizationUri, tenantID), new ADALTokenCache(signInUserId));
- AuthenticationResult result = authContext.AcquireTokenByAuthorizationCode(code, new Uri(HttpContext.Current.Request.Url.GetLeftPart(UriPartial.Path)), credential, SettingsHelper.AADGraphResourceId);
- return Task.FromResult(0);
- },
- RedirectToIdentityProvider = (context) =>
- {
- string appBaseUrl = context.Request.Scheme + "://" + context.Request.Host + context.Request.PathBase;
- context.ProtocolMessage.RedirectUri = appBaseUrl + "/";
- context.ProtocolMessage.PostLogoutRedirectUri = appBaseUrl;
- return Task.FromResult(0);
- },
- AuthenticationFailed = (context) =>
- {
- context.HandleResponse();
- return Task.FromResult(0);
- }
- }
- });
- }
上述代码在项目中的App_Start文件夹下Startup.Auth.cs,是Owin的Server端配置内容。Owin中间件是在应用启动时注册,注册方式是扫描跟文件夹下的Startup.cs,存在则使用该配置类注册。针对OWIN的处理机制,我们在后续的章节中单独分析OWIN中间件的架构,当前我们主要聚焦在如何使用OpenID及OAuth。在上面的代码中,有这么一句:
app.SetDefaultSignInAsAuthenticationType(CookieAuthenticationDefaults.AuthenticationType);
app是Owin中的基础接口类型,用于内部拓展不同的验证机制,使用IDictionary<string, object> Properties { get; }这样一个字典类型存储我们应用程序验证所需的信息。SetDefaultSignInAsAuthenticationType指明Owin默认使用的验证方式,为了保持用户的登录状态,我们使用cookie作为默认验证方式,当cookie未登录时,Owin继续使用下面注册的其他方式尝试验证。
app.UseCookieAuthentication(new CookieAuthenticationOptions());
UseCookieAuthentication是Owin实现的Cookie验证方式。在Owin的源代码中,每一种方式都包含基本的处理类:
- AuthenticationDefaults.cs
- AuthenticationExtensions.cs
- AuthenticationHandler.cs
- AuthenticationMiddleware.cs
- AuthenticationOptions.cs
此时我们使用new CookieAuthenticationOptions()初始化Cookie验证默认配置。当Cookie中无验证信息时,会进入到app.UseOpenIdConnectAuthentication
在OpenID验证中,配置了如下参数:
下面是一个TokenValidationParameters参数的示例:
- TokenValidationParameters = new System.IdentityModel.Tokens.TokenValidationParameters
- {
- IssuerValidator = (issuer, token) =>
- {
- return DoesIssuerBelongToMyCustomersList(issuer);//DoesIssuerBelongToMyCustomersList方法根据当前登陆人信息判断是否在用户列表中,如果不存在,则返回false
- }
- }
作者: admin 时间: 2018-11-24 16:32
接上文
接下来分析Notifications参数:
- AuthorizationCodeReceived = (context) =>
- {
- var code = context.Code;
- ClientCredential credential = new ClientCredential(SettingsHelper.ClientId, SettingsHelper.AppKey);
- String signInUserId = context.AuthenticationTicket.Identity.FindFirst(ClaimTypes.NameIdentifier).Value;
- AuthenticationContext authContext = new AuthenticationContext("https://login.windows.net/common", new ADALTokenCache(signInUserId));
- AuthenticationResult result = authContext.AcquireTokenByAuthorizationCode(code, new Uri(HttpContext.Current.Request.Url.GetLeftPart(UriPartial.Path)), credential, SettingsHelper.AADGraphResourceId);
- return Task.FromResult(0);
- },
- RedirectToIdentityProvider = (context) =>
- {
- string appBaseUrl = context.Request.Scheme + "://" + context.Request.Host + context.Request.PathBase;
- context.ProtocolMessage.RedirectUri = appBaseUrl + "/";
- context.ProtocolMessage.PostLogoutRedirectUri = appBaseUrl;
- return Task.FromResult(0);
- },
- AuthenticationFailed = (context) =>
- {
- context.HandleResponse();
- return Task.FromResult(0);
- }
在Notifications参数方法中定义了3个委托方法,当调用OpenId验证通过并返回Code参数时,Owin调用AuthorizationCodeReceived,RedirectToIdentityProvider方法用于定义验证通过后的返回页面地址,AuthenticationFailed定义验证失败后的处理方法。在AuthorizationCodeReceived这个方法中,我们使用文档开始提到的AAD授权代码流方式为用户授权。SettingsHelper.ClientId是应用程序ID,是应用程序在AAD中的唯一标识。
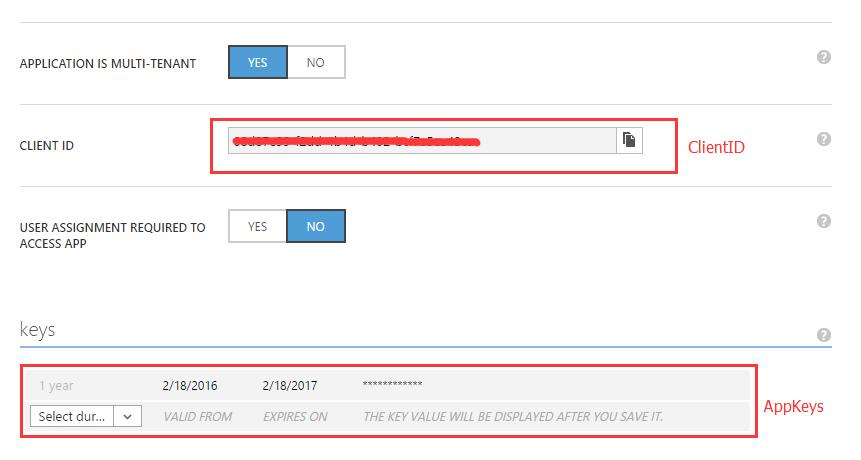
SettingsHelper.AppKey是应用程序中新建的keys(可以使用多个),新建的方法如下:
进入AAD中的应用程序管理,添加app key,这个key是有过期时间的,最多2年。这里提醒一下,新建key以后需要保存才能看到key字符串,而且只有第一次能查看,如果忘记了只能重新建一个。
接着往下面看,context对象是Owin根据返回的id_token生成的上下文,这里的signInUserId是用户在AAD中对象标识符:
String signInUserId = context.AuthenticationTicket.Identity.FindFirst(ClaimTypes.NameIdentifier).Value;
我们使用signInUserId来唯一标识用户的Token缓存对象,新建一个AuthenticationContext对象,这个对象是基于ADAL 创建,如有想要了解什么是ADAL,请参阅The New Token Cache in ADAL v2。创建对象的同时,我们将对象ADALTokenCache作为TokenCache传入对象,ADALTokenCache是我们自定义用来缓存用户Token的类,如下:
- public class ADALTokenCache : TokenCache
- {
- string User;
- UserTokenCache Cache;
- // constructor
- public ADALTokenCache(string user)
- {
- // associate the cache to the current user of the web app
- User = user;
- this.AfterAccess = AfterAccessNotification;
- this.BeforeAccess = BeforeAccessNotification;
- this.BeforeWrite = BeforeWriteNotification;
- using (ApplicationDbContext db = new ApplicationDbContext())
- {
- Cache = db.UserTokenCacheList.FirstOrDefault(c => c.webUserUniqueId == User);
- }
- this.Deserialize((Cache == null) ? null : Cache.cacheBits);
- }
- public override void Clear()
- {
- base.Clear();
- using (ApplicationDbContext db = new ApplicationDbContext())
- {
- Cache = db.UserTokenCacheList.FirstOrDefault(c => c.webUserUniqueId == User);
- if (Cache != null)
- db.UserTokenCacheList.Remove(Cache);
- db.SaveChanges();
- }
- }
- void BeforeAccessNotification(TokenCacheNotificationArgs args)
- {
- using (ApplicationDbContext db = new ApplicationDbContext())
- {
- if (Cache == null)
- {
- // first time access
- Cache = db.UserTokenCacheList.FirstOrDefault(c => c.webUserUniqueId == User);
- }
- else
- { // retrieve last write from the DB
- var status = from e in db.UserTokenCacheList
- where (e.webUserUniqueId == User)
- select new
- {
- LastWrite = e.LastWrite
- };
- // if the in-memory copy is older than the persistent copy
- if (status != null && status.Count() > 0 && status.First().LastWrite > Cache.LastWrite)
- {
- Cache = db.UserTokenCacheList.FirstOrDefault(c => c.webUserUniqueId == User);
- }
- }
- }
- this.Deserialize((Cache == null) ? null : Cache.cacheBits);
- }
- // Notification raised after ADAL accessed the cache.
- // If the HasStateChanged flag is set, ADAL changed the content of the cache
- void AfterAccessNotification(TokenCacheNotificationArgs args)
- {
- if (this.HasStateChanged)
- {
- using (ApplicationDbContext db = new ApplicationDbContext())
- {
- if (Cache == null || Cache.UserTokenCacheId == 0)
- {
- Cache = new UserTokenCache
- {
- webUserUniqueId = User,
- cacheBits = this.Serialize(),
- LastWrite = DateTime.Now
- };
- }
- else
- {
- Cache.cacheBits = this.Serialize();
- Cache.LastWrite = DateTime.Now;
- }
- db.Entry(Cache).State = Cache.UserTokenCacheId == 0 ? EntityState.Added : EntityState.Modified;
- db.SaveChanges();
- }
- this.HasStateChanged = false;
- }
- }
- void BeforeWriteNotification(TokenCacheNotificationArgs args)
- {
- // if you want to ensure that no concurrent write take place, use this notification to place a lock on the entry
- }
- }
这里我修改了一些代码,示例中的代码是用户每次获取新资源的Token时新增一条Cache数据,为了多用户访问,我将缓存机制改为每个用户对应一条Cache数据。
AuthenticationResult result = authContext.AcquireTokenByAuthorizationCode(code, new Uri(HttpContext.Current.Request.Url.GetLeftPart(UriPartial.Path)), credential, SettingsHelper.AADGraphResourceId);
AcquireTokenByAuthorizationCode是ADAL帮我们定义好的授权代码流方法,用于通过code获取token,同时我们指定请求SettingsHelper.AADGraphResourceId(AAD Graph web resource)资源,这样可以验证我们的应用是否有对应资源的访问权限。当然,这个参数是可选的。
验证逻辑图如下:
结束语Office 365开发系列的身份认证就到这里了,如有不明白的地方,请在评论中提出。后续章节我们会继续深入了解OWIN及ADAL的机制,希望大家继续关注。
本文转载自博客园:任泽华Ryan《[ Office 365 开发系列 ] 身份认证》
| 欢迎光临 Office中国论坛/Access中国论坛 (http://www.office-cn.net/) |
Powered by Discuz! X3.3 |